How to Integrate the ICP Ledger and ICP Index Canisters in a React Frontend Project


Introduction
The ICP ledger canister is a critical smart contract canister that holds accounts and transactions for the Internet Computer Protocol's (ICP) utility token. Meanwhile, the ICP index canister is used to retrieve transaction history from the ICP ledger canister. In this article, we'll explore how to use these canisters in a frontend React project, allowing you to manage ICP tokens and transaction history with ease.
Prerequisites
- Prior knowledge of front-end development using HTML, CSS, Javascript, and React
- dfx installed on your machine
- Prior knowledge of the command line or Terminal
- Code editors like VsCode or sublime Text
- Internet connection
- Internet Browser
What is DFX
It is a command line execution environment for creating, deploying, and managing dapps on the Internet Computer. It also provides a local execution environment to test and deploy dapps before deploying them on the live network
What is Internet Identity
Internet Identity in the Internet Computer ecosystem is a decentralized, open-source identity system that allows users to create and manage their digital identities. It is built on top of the Internet Computer blockchain, which provides a secure and immutable ledger for storing user identity information.
With Internet Identity, users can create a unique digital identity that is linked to their public key on the blockchain. This identity can be used to authenticate and interact with various decentralized applications and services on the Internet Computer. Internet Identity also allows users to control their data and decide how it is shared with other parties.
Here is what we will build in this project and the code for this project can be found here

Setting up the project
We are going to use a boiler template for this project in order to make this article not long. the template already has the Internet Identity(II) setup. if you want to learn how to set up the internet identity for your project from scratch, I recommend checking out this YouTube video that explains the whole process. With that in mind, the first thing to do is to open up your terminal.
- Clone the repo.
git clone https://github.com/sam-the-tutor/React-Motoko-II-Template.git - Navigate to the project folder
cd React-Motoko-II-Template - Install the dependencies
npm install - Start the replica and deploy the project
dfx start --background dfx deploy - Start the development server
npm start
You will be provided with a link usually http://localhost:3000/. Click on that link and the project will be opened in a browser. If everything is okay at this stage, you should see a page like the one below.

Click on the button to log in with your internet Identity, if you have already created one. Since it will be your first time using this project, you will be prompted to create a new identity on the local host to use for this project.
Follow the instructions to create one and you will be automatically logged in once the process is complete. On successful login, you will be presented with this page, that shows a logout button and the principal ID of your Identity.

Note: The reason why we set up the Internet Identity is because the ICP Ledger that we are going to interact with restricts the anonymous Identity from accessing some or most of the functionality available on the ICP Ledger.
that completes the section for the internet identity setup. the next section is to setup the
All the configurations for the Internet Identity are in the use-auth-client.jsx file. In that file, we use the React useContext to make some of our functionality global to the project and we will use that functionality in our project
Setting up the ICP Ledger Canister.
In order to interact with the icp ledger on the local machine, we need to set up one for our project. there is already a guide on how to set up the ICP ledger on the local machine. So I will not waste a lot of time on this section
Open the project in your favorite code editor.
Add this code to the dfx.json file. This defines the necessary information for the ICP ledger canister.
"icp_ledger_canister": {
      "type": "custom",
      "candid": "https://raw.githubusercontent.com/dfinity/ic/d87954601e4b22972899e9957e800406a0a6b929/rs/rosetta-api/icp_ledger/ledger.did",
      "wasm": "https://download.dfinity.systems/ic/d87954601e4b22972899e9957e800406a0a6b929/canisters/ledger-canister.wasm.gz",
      "remote": {
        "id": {
          "ic": "ryjl3-tyaaa-aaaaa-aaaba-cai"
        }
      }
    }
Next, open your terminal and run the code below to install the ICP ledger
dfx identity use minter
export MINTER_ACCOUNT_ID=$(dfx ledger account-id)

dfx identity use default
export DEFAULT_ACCOUNT_ID=$(dfx ledger account-id)

dfx deploy --specified-id ryjl3-tyaaa-aaaaa-aaaba-cai icp_ledger_canister --argument "
  (variant {
    Init = record {
      minting_account = \"$MINTER_ACCOUNT_ID\";
      initial_values = vec {
        record {
          \"$DEFAULT_ACCOUNT_ID\";
          record {
            e8s = 10_000_000_000 : nat64;
          };
        };
      };
      send_whitelist = vec {};
      transfer_fee = opt record {
        e8s = 10_000 : nat64;
      };
      token_symbol = opt \"LICP\";
      token_name = opt \"Local ICP\";
    }
  })
"
In the code above, we first create a new identity minter, get the account-id associated with that identity, and save it an a variable MINTER_ACCOUNT_ID. we repeat the same pricedure for the identity default
we then deploy the icp-ledger-canister with a specific id ryjl3-tyaaa-aaaaa-aaaba-cai, which is the same identity for the ICP ledger on the main network. The code above mints some tokens and sends them to the DEFAULT_ACCOUNT_ID. We will use this account id in our project and also the -----
If thee abovoe step is successful, we should now have a local ICP ledger that we can interact with from our project.
Next is to download the icp ledger npm package that we will use to interact with the ledger.
Downloading the ICP ledger npm package
In order to be able to interact with our ICP Legder from our project, we will need to download and install the icp ledger package and configure it.
Open your terminal and run the command
npm i @dfinity/ledger-icp
Install the other dependencies that the ledger-icp package depends on
npm i @dfinity/agent @dfinity/candid @dfinity/principal @dfinity/utils @dfinity/nns-proto
Now we can use the ledger-icp in our project.
Setting up the frontend code for the project
In the components folder, create a new file Ledger.jsx
Copy and Paste the following code in the file
import React, { useEffect, useState } from 'react'
import { LedgerCanister, AccountIdentifier } from '@dfinity/ledger-icp'
import { createAgent } from '@dfinity/utils'
import { useAuth } from '../../use-auth-client'
import { Principal } from '@dfinity/principal'
In the above code, we import the useEffect and useState hooks form the react package. From the ledger-icp package. we import the LedegerCanister that we will use to interact with the ICP Ledger on and the AccountIdentifier to format the principal IDs.
From the use-auth-client file, we import the useAuth method that will allow use to interact with our Internet Identity in our project Finally, we import the Principal from the @dfinity/principal package
const { identity, logout, principal } = useAuth()
const [ICPLedger, setICPLedger] = useState(null)
const [hexID, setHexID] = useState(null)
const [bal, setBal] = useState(null)

const MY_LEDGER_CANISTER_ID = 'ryjl3-tyaaa-aaaaa-aaaba-cai'
const HOST = `http://localhost:4943?canisterId=${process.env.CANISTER_ID_INTERNET_IDENTITY}#authorize`
In the above code, we destructure the useAuth function to get the identity, we useState hook to create the ICPLegder,princID and bal hooks Next, we define the constanst to hold the id of our ICP ledger and finally the HOST which will hold the url of our identity provider in our project.
Since we are running the projct locally, we refer to the internet identity canister that we deployed on our machine.
useEffect(() => {
  setUpLedger()
}, [])
async function setUpLedger() {
  const agent = await createAgent({
    identity,
    host: HOST,
  })
  //{ transactionFee, transfer, icrc1Transfer,accountBalance }
  let ledger = LedgerCanister.create({
    agent,
    canisterId: MY_LEDGER_CANISTER_ID,
  })
  setICPLedger(ledger)
  console.log('Icp ledger setup successfully')
}
We use the useEffect react hook to run the setUpLedger function everytime the compeonent is loaded
In our setUpLedger function,we start by creatting an agent that takes in an object as its arguments. the object contains the identity and the host that we have already setup.
Once the agent is created,we use the LedgerCanister method from the ledger-icp package to create an instance of our ledger canister in order to interact with it. it takes in an object as it argument. the object contains the agent that we created from the previous step, as well as the canister id of the ledger canister
We finalize by updating the ICPLedger state to the currently created ledger and then log that the ledger has been created successdully.
Now that we have the our ICP ledger setup correctly, we ca now interact with it from our project.
Checking account balance
During the ICP Ledger installation, we minted icp tokens to a certain account and we are going to check the balance of that account
In your terminal, run this command and copy the account id that will be displayed. the account id is in a HEX format
dfx identity use default
dfx ledger account-id
Now back to your Ledger.jsx file, paste the following code
async function getBalance() {
  const accIdentifier = AccountIdentifier.fromHex(
    //replace this with the account id that you copied from the previous step
    'c534cb97073c30f897c8dfdd50c86406b297ae9028299f4592ac4a0cb6692f06',
  )
  const res = await ICPLedger.accountBalance({
    accountIdentifier: accIdentifier,
    certified: false,
  })
  setBal(Number(res))
  console.log('Icp balance :', res)
}

async function princToAcc() {
  const acc = AccountIdentifier.fromPrincipal({
    principal: principal,
    subAccount: undefined,
  }).toHex()
  setHex(acc)
  console.log(acc)
}
We declare a function getBalance. In the function, we use the AccountIdentifier.fromHex to convert the account id to the account identifier format. Next, we use ICP ledger to check the balance of our account id and then update the bal state with the new value
Next, we declare the princToAcc function. We use the AccountIdentifier method to conveert the principal ID of the loggedin user to its HEX representation.
 <div>
      <div
        style={{
          display: 'flex',
          flexDirection: 'column',
          gap: '10px',
        }}
      >
        <h2>ICP Ledger Walkthrough</h2>
        <div
          style={{
            display: 'flex',
            flexDirection: 'column',
            gap: '10px',
            padding: '10px',
            alignItems: 'center',
          }}
        >
          <button
            style={{ backgroundColor: 'brown', color: 'white', width: '400px' }}
            onClick={() => logout()}
          >
            Logout
          </button>
          <br/>

          <button
            style={{ backgroundColor: 'brown', color: 'white', width: '400px' }}
            onClick={() => getBalance()}
          >
            Get Balance
          </button>
          <span>Balance : {bal}</span>
          <button
            style={{ backgroundColor: 'brown', color: 'white', width: '400px' }}
            onClick={() => princToAcc()}
          >
            princToAcc
          </button>
          <span>Hex Account : {hexID}</span>
        </div>
      </div>
    </div>
We have some buttons that which when clicked, we call the respective functions. If everything is okay the whole code for the Ledger.jsx
import React, { useEffect, useState } from 'react'
import { LedgerCanister, AccountIdentifier } from '@dfinity/ledger-icp'
import { createAgent } from '@dfinity/utils'
import { useAuth } from '../use-auth-client'
import { Principal } from '@dfinity/principal'
const Ledger = () => {
  const { identity, logout, principal } = useAuth()
  const [ICPLedger, setICPLedger] = useState(null)
  const [hexID, setHexID] = useState(null)
  const [bal, setBal] = useState(null)
  const MY_LEDGER_CANISTER_ID = 'ryjl3-tyaaa-aaaaa-aaaba-cai'
  const HOST = `http://localhost:4943?canisterId=${process.env.CANISTER_ID_INTERNET_IDENTITY}#authorize`

  useEffect(() => {
    setUpLedger()
  }, [])
  async function setUpLedger() {
    const agent = await createAgent({
      identity,
      host: HOST,
    })
    let ledger = LedgerCanister.create({
      agent,
      canisterId: MY_LEDGER_CANISTER_ID,
    })
    setICPLedger(ledger)
    console.log('Icp ledger setup successfully')
  }

  async function getBalance() {
    const accIdentifier = AccountIdentifier.fromHex(
      'ebc5f90afc543a620a4b05a1621284a4863ff02649206a4be3718b3cd0511571',
    )
    const res = await ICPLedger.accountBalance({
      accountIdentifier: accIdentifier,
      certified: false,
    })
    setBal(Number(res))
    console.log('Icp balance :', res)
  }

  async function princToAcc() {
    const acc = AccountIdentifier.fromPrincipal({
      principal: principal,
      subAccount: undefined,
    }).toHex()
    setHexID(acc)
    console.log(acc)
  }

  return (
    <div>
      <div
        style={{
          display: 'flex',
          flexDirection: 'column',
          gap: '10px',
        }}
      >
        <h2>ICP Ledger Tutorial</h2>
        <div
          style={{
            display: 'flex',
            flexDirection: 'column',
            gap: '10px',
            padding: '10px',
            alignItems: 'center',
          }}
        >
          <button
            style={{ backgroundColor: 'brown', color: 'white', width: '400px' }}
            onClick={() => logout()}
          >
            Logout
          </button>
          <br />

          <button
            style={{ backgroundColor: 'brown', color: 'white', width: '400px' }}
            onClick={() => getBalance()}
          >
            Get Balance
          </button>
          <span>Balance : {bal}</span>
          <button
            style={{ backgroundColor: 'brown', color: 'white', width: '400px' }}
            onClick={() => princToAcc()}
          >
            princToAcc
          </button>
          <span>Hex Account : {hexID}</span>
        </div>
      </div>
    </div>
  )
}
export default Ledger
import React from 'react'
import { useAuth } from '../use-auth-client'
import Ledger from './Ledger'

const one = () => {
  const { isAuthenticated, login, principal, logout } = useAuth()
  return (
    <>
      {isAuthenticated ? (
        <Ledger />
      ) : (
        <button
          style={{ backgroundColor: 'brown', color: 'white' }}
          onClick={login}
        >
          Log in
        </button>
      )}
    </>
  )
}
export default one
Run the following command to deploy the frontend canister and also generate the .env variables that we need in the Ledger.jsx file
dfx deploy
Import the Ledger.jsx file in the Login.jsx file and configure it shows when the user has logged in successfully
At this stage, if you have followed all the steps correctly, you should have the following screen in your browser after logging in.
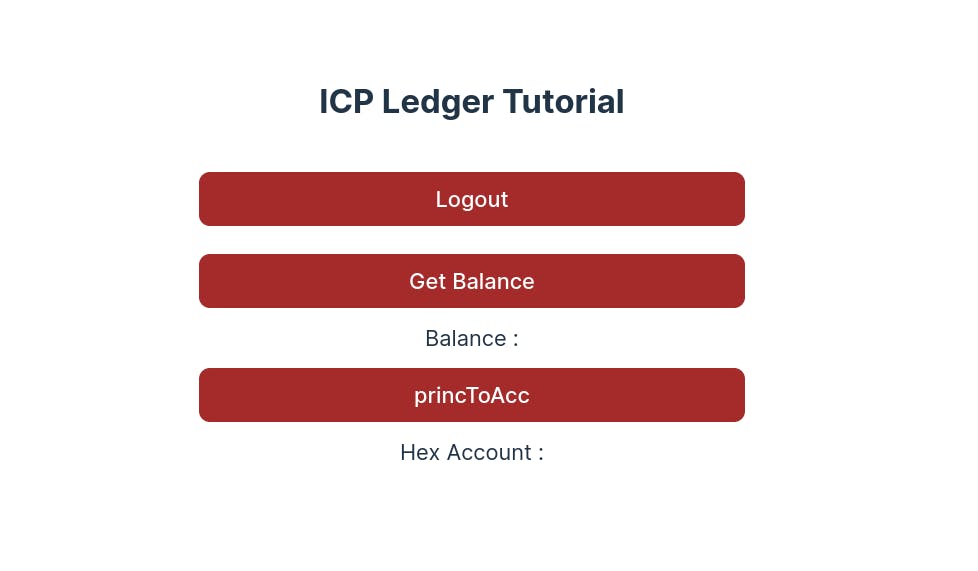
You can interact with the project by pressing the buttons to call the respective functions.

Above is the screenshot of the webpage when you call the get Balance and princToAcc functions. The ICP balance showed is the balance of the account ID that received the ICP tokens when we were deploying the ICP canister
To see which other methods are available on the ledger-icp package that we can use on our ICP Ledger, click here
The next step is to set up the ICP Index canister so that we are able to get the transaction history of different account IDs from the ICP Ledger canister.
Setting up the ICP Index Canister.
In this section, we are going to learn how to utilize the ICP Index canister in order to get the transactions from the ICP ledger canister. Unfortunately, there is no package that is available to us to utilize when setting up the Index canister, so we will have to manually set it up.
Setting up the dfx.json
Copy and paste the code in the dfx.json
"icp_index_canister": {
      "type": "custom",
      "candid": "https://raw.githubusercontent.com/dfinity/ic/d87954601e4b22972899e9957e800406a0a6b929/rs/rosetta-api/icp_ledger/index/index.did",
      "wasm": "https://download.dfinity.systems/ic/d87954601e4b22972899e9957e800406a0a6b929/canisters/ic-icp-index-canister.wasm.gz",
            "remote": {
        "id": {
          "ic": "qhbym-qaaaa-aaaaa-aaafq-cai"
        }
      }
    }
The above code defines the ICP index canister configurations..
dfx deploy icp_index_canister --specified-id qhbym-qaaaa-aaaaa-aaafq-cai --argument '(record {ledger_id = principal "ryjl3-tyaaa-aaaaa-aaaba-cai"})'
Next, we install the Index canister and link it to our ICP ledger canister. Once the setup is complete, we can now use the canister in our front end.
Frontend ICP Index Canister Setup
In order to use the ICP index canister in our front end, we will need two things, its canister ID and its javascript IDL file. Now, there is a standard javascript IDL file for the ICP Index canister, which can be accessed from the dashboard
The IDL is available in different languages, but for our case, we will select the javascript IDL since we are using javascript in our frontend. In the code editor, navigate to the Ledger folder inside the components folder, and create a new file called index.did.js. Paste the code below and save it
export const idlFactory = ({ IDL }) => {
  const InitArg = IDL.Record({ ledger_id: IDL.Principal })
  const GetAccountIdentifierTransactionsArgs = IDL.Record({
    max_results: IDL.Nat64,
    start: IDL.Opt(IDL.Nat64),
    account_identifier: IDL.Text,
  })
  const Tokens = IDL.Record({ e8s: IDL.Nat64 })
  const TimeStamp = IDL.Record({ timestamp_nanos: IDL.Nat64 })
  const Operation = IDL.Variant({
    Approve: IDL.Record({
      fee: Tokens,
      from: IDL.Text,
      allowance: Tokens,
      expires_at: IDL.Opt(TimeStamp),
      spender: IDL.Text,
    }),
    Burn: IDL.Record({ from: IDL.Text, amount: Tokens }),
    Mint: IDL.Record({ to: IDL.Text, amount: Tokens }),
    Transfer: IDL.Record({
      to: IDL.Text,
      fee: Tokens,
      from: IDL.Text,
      amount: Tokens,
    }),
    TransferFrom: IDL.Record({
      to: IDL.Text,
      fee: Tokens,
      from: IDL.Text,
      amount: Tokens,
      spender: IDL.Text,
    }),
  })
  const Transaction = IDL.Record({
    memo: IDL.Nat64,
    icrc1_memo: IDL.Opt(IDL.Vec(IDL.Nat8)),
    operation: Operation,
    created_at_time: IDL.Opt(TimeStamp),
  })
  const TransactionWithId = IDL.Record({
    id: IDL.Nat64,
    transaction: Transaction,
  })
  const GetAccountIdentifierTransactionsResponse = IDL.Record({
    balance: IDL.Nat64,
    transactions: IDL.Vec(TransactionWithId),
    oldest_tx_id: IDL.Opt(IDL.Nat64),
  })
  const GetAccountIdentifierTransactionsError = IDL.Record({
    message: IDL.Text,
  })
  const Result = IDL.Variant({
    Ok: GetAccountIdentifierTransactionsResponse,
    Err: GetAccountIdentifierTransactionsError,
  })
  const GetBlocksRequest = IDL.Record({
    start: IDL.Nat,
    length: IDL.Nat,
  })
  const GetBlocksResponse = IDL.Record({
    blocks: IDL.Vec(IDL.Vec(IDL.Nat8)),
    chain_length: IDL.Nat64,
  })
  const HttpRequest = IDL.Record({
    url: IDL.Text,
    method: IDL.Text,
    body: IDL.Vec(IDL.Nat8),
    headers: IDL.Vec(IDL.Tuple(IDL.Text, IDL.Text)),
  })
  const HttpResponse = IDL.Record({
    body: IDL.Vec(IDL.Nat8),
    headers: IDL.Vec(IDL.Tuple(IDL.Text, IDL.Text)),
    status_code: IDL.Nat16,
  })
  const Status = IDL.Record({ num_blocks_synced: IDL.Nat64 })
  return IDL.Service({
    get_account_identifier_balance: IDL.Func(
      [IDL.Text],
      [IDL.Nat64],
      ['query'],
    ),
    get_account_identifier_transactions: IDL.Func(
      [GetAccountIdentifierTransactionsArgs],
      [Result],
      ['query'],
    ),
    get_blocks: IDL.Func([GetBlocksRequest], [GetBlocksResponse], ['query']),
    http_request: IDL.Func([HttpRequest], [HttpResponse], ['query']),
    ledger_id: IDL.Func([], [IDL.Principal], ['query']),
    status: IDL.Func([], [Status], ['query']),
  })
}
export const init = ({ IDL }) => {
  const InitArg = IDL.Record({ ledger_id: IDL.Principal })
  return [InitArg]
}
The above code defines all the methods that we can access on our ICP Index canister from our frontend
In the same folder create a new file and name it createActor.js paste the code below
import { Actor, HttpAgent } from '@dfinity/agent'
import { idlFactory } from './index.did.js'

export const createActor = (canisterId, options = {}) => {
  const agent = options.agent || new HttpAgent({ ...options.agentOptions })

  if (options.agent && options.agentOptions) {
    console.warn(
      'Detected both agent and agentOptions passed to createActor. Ignoring agentOptions and proceeding with the provided agent.',
    )
  }

  // Fetch root key for certificate validation during development
  if (process.env.DFX_NETWORK !== 'ic') {
    agent.fetchRootKey().catch((err) => {
      console.warn(
        'Unable to fetch root key. Check to ensure that your local replica is running',
      )
      console.error(err)
    })
  }

  // Creates an actor with using the candid interface and the HttpAgent
  return Actor.createActor(idlFactory, {
    agent,
    canisterId,
    ...options.actorOptions,
  })
}
We import the Actor and HttpAgent from the @dfinity/agent package. We then import the IDL file that we created from the previous step. we declare and export a function createActor that takes in two arguments; the canisterId and the options. the function creates an actor using the parameters supplied and returns so that it can be used.
Modifying the Ledger.jsx file
In the Ledger.jsx file, add the following code.
import { createActor } from './createActor'
We first import the createActor method from the createActor file that we created from the previous step
const [indexCanister, setIndexCanister] = useState(null)
const ICPIndexID = 'qhbym-qaaaa-aaaaa-aaafq-cai'
Using the ueState react hook, we declare the indexcanister state that we will update at a later stage. We also declare a variable ICPIndexID that holds the id of the ICP index canister
const actor = createActor(ICPIndexID, {
  agentOptions: {
    identity,
  },
})

setIndexCanister(actor)
console.log('index canister set up successfully')
Add the above code to the setUpLedger function which we declared when we were setting up the ledger canister. The above code creates our Index canister actor and then updates the indexCanister state so that we can start using our Index canister
Now that we have finished setting up the Index canister, it's time to start using it in our project.
We will use the index canister to get the transaction history for our account ID but we need to do a few more transactions so as to get more transaction history.
In the terminal, we will use the account ID that received our tokens and send some of those tokens to another account ID
dfx identity use default

 dfx canister call icp_ledger_canister send_dfx '
 (record{
    memo= 1234;
    amount=(record{
        e8s=20000;
    });
    fee=(record{
        e8s=10000;
    });
    from_subaccount= null;
    to= "c534cb97073c30f897c8dfdd50c86406b297ae9028299f4592ac4a0cb6692f06";
    created_at_time= null;
 })'
We first switch our identity to the identity that received the ICP tokens. Next, we call the send_dfx method icp_ledger_canister in order to send some tokens to another account ID. The send_dfx method transfers tokens to an account identifier account. In order to transfer tokens to a principal ID, you can use the code below.
 dfx canister call icp_ledger_canister icrc1_transfer '
   (record {
     to=(record {
       owner=(principal "xowmd-grmzf-2dacu-dlg3b-3pqmc-xyu7k-xwr5s-dngy4-uvvlq-kycr4-rqe")
     });
     amount=200_000
   })
 '
You need to transfer the ICP tokens a couple of times in order to get a good number of transactions in your history. Once you are done with the transfers, it is time to go back to the Ledger.jsx code and retrieve the transaction history for our account ID
Paste the following code in the Ledger.jsx,
async function getTransactions() {
  const results = await indexCanister.get_account_identifier_transactions({
    start: [],
    max_results: 10,
    account_identifier:
      'ebc5f90afc543a620a4b05a1621284a4863ff02649206a4be3718b3cd0511571',
  })

  if (results.Ok) {
    console.log('transactions results :', results.Ok.transactions)
  }
}
We declare a function getTransactions function, and we then call the get_account_identifier_transactions method IndexCanister which takes in an object as its argument. the object contains the;
- start: the index of the transactions in the Index canister from which to start from. In our case, we leave it empty.
- account_identifier: the account id whose transaction history we want to return.
- max_results: the number of records to retrieve, for our case, we only want 10. if we leave this empty, all the transactions for the specific account ID will be returned.
If there are results returned, we log them in the browser.
<button
style={{ backgroundColor: 'brown', color: 'white', width: '400px' }}
onClick={() => getTransactions()}
>
Get Transactions
</button>
Finally, we add a button in the return section of the page that will call the getTransactions() when clicked
The new code for the Ledger.jsx should look like this
import React, { useEffect, useState } from 'react'
import { LedgerCanister, AccountIdentifier } from '@dfinity/ledger-icp'
import { createAgent } from '@dfinity/utils'
import { useAuth } from '../use-auth-client'
import { Principal } from '@dfinity/principal'
import { createActor } from './createActor'
const Ledger = () => {
  const { identity, logout, principal } = useAuth()
  const [ICPLedger, setICPLedger] = useState(null)
  const [hexID, setHexID] = useState(null)
  const [bal, setBal] = useState(null)
  const MY_LEDGER_CANISTER_ID = 'ryjl3-tyaaa-aaaaa-aaaba-cai'
  const HOST = `http://localhost:4943?canisterId=${process.env.CANISTER_ID_INTERNET_IDENTITY}#authorize`
  const [indexCanister, setIndexCanister] = useState(null)
  const ICPIndexID = 'qhbym-qaaaa-aaaaa-aaafq-cai'
  useEffect(() => {
    setUpLedger()
  }, [])
  async function setUpLedger() {
    const agent = await createAgent({
      identity,
      host: HOST,
    })
    //{ transactionFee, transfer, icrc1Transfer,accountBalance }
    let ledger = LedgerCanister.create({
      agent,
      canisterId: MY_LEDGER_CANISTER_ID,
    })
    setICPLedger(ledger)
    console.log('Icp ledger setup successfully')
    const actor = createActor(ICPIndexID, {
      agentOptions: {
        identity,
      },
    })

    setIndexCanister(actor)
    console.log('index canister set up successfully')
  }

  async function getTransactions() {
    const results = await indexCanister.get_account_identifier_transactions({
      start: [],
      max_results: 10,
      account_identifier:
        'ebc5f90afc543a620a4b05a1621284a4863ff02649206a4be3718b3cd0511571',
    })

    if (results.Ok) {
      console.log('transactions results :', results.Ok.transactions)
    }
  }

  async function getBalance() {
    const accIdentifier = AccountIdentifier.fromHex(
      'ebc5f90afc543a620a4b05a1621284a4863ff02649206a4be3718b3cd0511571',
    )
    const res = await ICPLedger.accountBalance({
      accountIdentifier: accIdentifier,
      certified: false,
    })
    setBal(Number(res))
    console.log('Icp balance :', res)
  }

  async function princToAcc() {
    const acc = AccountIdentifier.fromPrincipal({
      principal: principal,
      subAccount: undefined,
    }).toHex()
    setHexID(acc)
    console.log(acc)
  }

  return (
    <div>
      <div
        style={{
          display: 'flex',
          flexDirection: 'column',
          gap: '10px',
        }}
      >
        <h2>ICP Ledger Tutorial</h2>
        <div
          style={{
            display: 'flex',
            flexDirection: 'column',
            gap: '10px',
            padding: '10px',
            alignItems: 'center',
          }}
        >
          <button
            style={{ backgroundColor: 'brown', color: 'white', width: '400px' }}
            onClick={() => logout()}
          >
            Logout
          </button>
          <br />

          <button
            style={{ backgroundColor: 'brown', color: 'white', width: '400px' }}
            onClick={() => getBalance()}
          >
            Get Balance
          </button>
          <span>Balance : {bal}</span>
          <button
            style={{ backgroundColor: 'brown', color: 'white', width: '400px' }}
            onClick={() => princToAcc()}
          >
            princToAcc
          </button>
          <span>Hex Account : {hexID}</span>

          <button
            style={{ backgroundColor: 'brown', color: 'white', width: '400px' }}
            onClick={() => getTransactions()}
          >
            Get Transactions
          </button>
        </div>
      </div>
    </div>
  )
}
export default Ledger
If you have followed all the previous steps correctly, your frontend should look like the one below
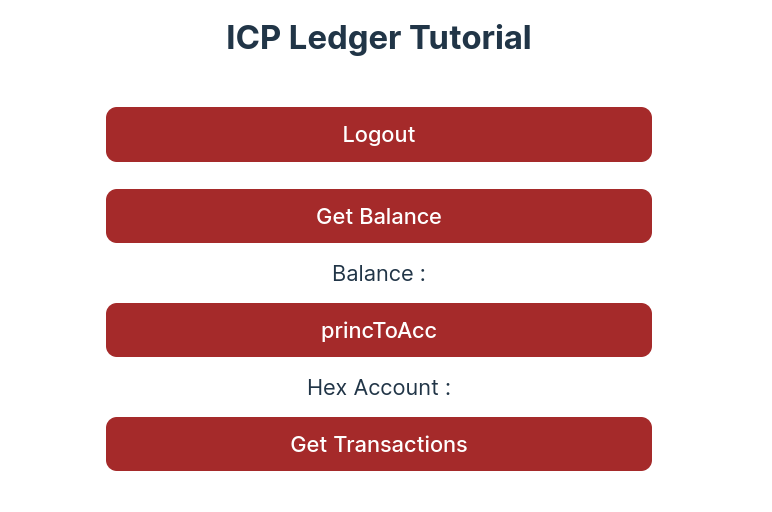
Clicking on the Get Transactions button, you should get something like this in the terminal.
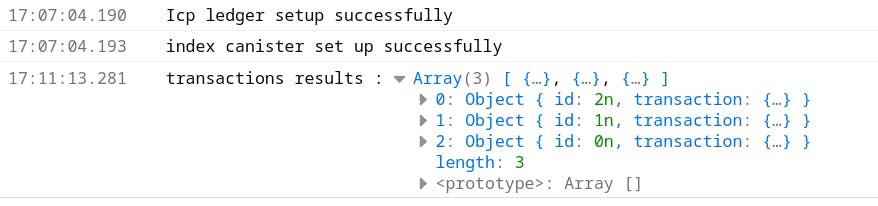
The array contains all the transactions for the account ID that we specified. You can choose to do whatever you want with that information like displaying those transactions in a table on the frontend.
Next Steps
We just looked at a few of the functions that both the ICP Legder and ICP Index canisters provide. Feel free to explore more on how you can use the other functions that we didn't look at.
Conclusion
In this article, you have learned how to set up the ICP ledger canister and use it in the front end, you have also looked at how to use the ICP Index canister in order to get the transaction history of different account ids. In case of any inquiries, let's connect on Twitter. I will be glad to help out.