Build A Whitelist Dapp on the Internet Computer using Motoko and Internet Identity
A step-by-step guide.


Introduction
A whitelist is a list of approved users or addresses that are granted access to a dapp or specific features within it.
In this tutorial, we will explore how to build a whitelist dapp on the Internet Computer. We will cover the basic concepts of whitelisting, revoking whitelist permissions, adding and removing admins from your dapp, and demonstrate how to implement these concepts in Motoko, the programming language used to write smart contracts on the Internet Computer. By the end of this tutorial, you will have a working understanding of how to write Motoko code, develop frontend in HTML, CSS, and JavaScript, use Internet Identity for authentication, and deploy Motoko dapps locally and on the mainnet.
Prerequisites
Prior knowledge of Motoko
Prior knowledge of front-end development using HTML, CSS, and Javascript
dfx installed on your machine
Prior knowledge of the command line or Terminal
Code editors like VsCode or sublime Text
Internet connection
Internet Browser
What is Motoko playground?
Motoko Playground is an online platform for developers to experiment with and learn the Motoko programming language, which is used to build smart contracts and dapps (decentralized applications) on the Internet Computer blockchain. It is a web-based environment that provides an easy-to-use interface for writing, testing, and deploying Motoko code. it allows developers to experiment with the Motoko language and the Internet Computer platform without needing to install any software on their local machine
What is DFX?
It is a command line execution environment for creating, deploying, and managing dapps on the Internet Computer. It also provides a local execution environment to test and deploy dapps before deploying them on the live network
What is Internet Identity?
Internet Identity in the Internet Computer ecosystem is a decentralized, open-source identity system that allows users to create and manage their digital identities. It is built on top of the Internet Computer blockchain, which provides a secure and immutable ledger for storing user identity information.
With Internet Identity, users can create a unique digital identity that is linked to their public key on the blockchain. This identity can be used to authenticate and interact with various decentralized applications and services on the Internet Computer. Internet Identity also allows users to control their data and decide how it is shared with other parties.
How the dapp works.
This is a simple whitelist dapp that enables users to request a whitelist spot from a project. A user logs into the dapp using their Internet identity credentials. Once logged in, the user can view their Principal ID, see the status of their whitelist request, and even request to be whitelisted.
On the other hand, the dapp has an admin dashboard. The admin can approve a whitelist request from the user, revoke the whitelist request, and add and delete other admins. The owner of the dApp has all the same privileges as the admin. Here is a demo of how the dapp will look on completion.
Backend Development
In this section, you will learn how to write the Motoko code for the whitelist dapp. Visit the Motoko playground website in your browser. Select New Motoko Project. We will develop everything from scratch. Copy and paste the following code into the open file main.mo
import Principal "mo:base/Principal";
import Text "mo:base/Text";
import Buffer "mo:base/Buffer";
We start by importing the required libraries to use in the program.
actor class whitelistDapp(dappOwner : Principal) = {};
We declare an actor class and name it whitelistDapp. It takes one argument dappOwner of type Principal. Learn more about Principal IDs. We want to explicitly provide the Principal ID of the owner of the dapp owner on deployment. All the remaining code for our program will go inside the actor class declared above.
  stable let owner : Principal = dappOwner;

  let requestBuffer = Buffer.Buffer<Principal>(0);

  let whitelistedBuffer = Buffer.Buffer<Principal>(0);

  let adminBuffer = Buffer.Buffer<Principal>(0);
Define a variable owner to hold the Principal ID of the dapp owner. Make the owner variable persist its value across upgrades by using the stable keyword. Declare three variables of type Buffer. Buffers are one of the data structures available in Motoko. Learn more about Buffers here and why we chose them for this project.
requestBuffer is to store the Principal IDs of users that request to be whitelisted whitelistedBuffer is to store the Principal IDs of users that have been whitelisted successfully
adminBuffer is to store the Principal IDs of admins.
Helper functions
  public func isAdmin(p : Principal) : async Bool {
    if ((p == owner)) {
      return true;
    } else if ((Buffer.contains<Principal>(adminBuffer, p, Principal.equal))) {
      return true;
    } else {
      return false;
    }

  };

  public func theOwner() : async Principal {
    return owner;
  };
Declare a public function isAdmin(). It takes in one argument of type Principal and returns a Bool. The function checks to see whether the given Principal IDmatches the owner of the dapp, or is among the list of approved admins.
The theOwner() the function returns the owner of the dapp declared on deployment.
User functions
 public shared({ caller }) func requestWhitelist() : async Text {
    if (Buffer.contains<Principal>(requestBuffer, caller, Principal.equal)) {
      "you have already requested for a whitelist";
    } else if (Buffer.contains<Principal>(whitelistedBuffer, caller, Principal.equal)) {
      return "You are already whitelisted"
    } else {
      requestBuffer.add(caller);
      return "Request accepted. Waiting for admin confirmation";

    };
  };


  public shared({ caller }) func checkStatus() : async Text {
    if ((Buffer.contains<Principal>(requestBuffer, caller, Principal.equal))) {
      return "Waiting for admin confirmation.";
    } else if ((Buffer.contains<Principal>(whitelistedBuffer, caller, Principal.equal))) {
      return "Congratulations. You are whitelisted"

    } else {
      return "Status unknown. Please request for the whitelist spot";
    };
  };
Declare a public function requestWhitelist() . It takes in no argument and returns a Text. It has a shared keyword because we want to interact with the Id that calls the function. Learn more about the shared keyword. Inside the function, we perform checks to ensure that:
the caller is not already on the request list
the caller is not already whitelisted.
If the caller passes the two checks, we add their Principal ID in the requestBuffer and then send them a message for them to wait on the admin confirmation
In the checkStatus(), we first check to see whether the caller's Principal ID is either on the waiting list or on the approved list. We then return the relevant text messages to show to the user depending on the condition.
Admin functions
  public shared({ caller }) func whitelistUser(user : Principal) : async Text {
    if (await isAdmin(caller)) {
      var resultText : Text = "";

      for (entry in requestBuffer.vals()) {
        if (entry == user) {
          let entryIndex = Buffer.indexOf<Principal>(
            entry,
            requestBuffer,
            Principal.equal,
          );
          switch (entryIndex) {
            case (?index) {
                ignore requestBuffer.remove(index);

                whitelistedBuffer.add(user);

              resultText := "User whitelisted successfully";
            };
            case (null) {
              resultText := "Request does not exist";
            };
          };

        };
      };
      return resultText;

    } else {
      "You are not approved to whitelist users";
    }

  };


  public shared({ caller }) func removeWhiteliste(user : Principal) : async Text {
    if (await isAdmin(caller)) {
      var resultText : Text = "";

      for (entry in whitelistedBuffer.vals()) {
        if (entry == user) {
          let entryIndex = Buffer.indexOf<Principal>(
            entry,
            whitelistedBuffer,
            Principal.equal,
          );
          switch (entryIndex) {
            case (?index) {
              ignore whitelistedBuffer.remove(index);
              resultText := "whitelist revoked successfully";
            };
            case (null) {
              resultText := "user does not exist";
            };
          };

        };
      };
      return resultText;

    } else {
      "You are not approved to revoke whitelists";
    }

  };
The whitelistUser() function performs the following operations.
Checks if the caller is the admin or the owner of the dapp
Searches for the entry in the
requestBufferthat matches the user's PrincipalDetermines the index of the user's Principal
Removes the index from the
requestBuffer, which in turn removes the entryAdds the entry in the
whitelistedBufferReturns a relevant text message.
The removeWhitelist() function performs the following operations.
Check if the caller is the admin or the owner of the dapp
Searches for the entry in the
whitelistedBufferthat matches the Principal from the inputDetermines the index of the entry
Removes the index from the
whitelistedBuffer, which in turn removes that entryReturns the relevant text message
 public shared({ caller }) func addAdmin(newAdmin : Principal) : async Text {

   if (await isAdmin(caller)) {
     if (not Buffer.contains<Principal>(adminBuffer, newAdmin, Principal.equal)) {
       adminBuffer.add(newAdmin);
       "Admin added successfully";
     } else {
       "User already admin";
     }
   } else {
     "You are not aproved to add admins";
   }
 };


 public shared({ caller }) func deleteAdmin(admin : Principal) : async Text {

   if (await isAdmin(caller)) {
     var resultText : Text = "";

     for (entry in adminBuffer.vals()) {
       if (entry == admin) {
         let entryIndex = Buffer.indexOf<Principal>(
           entry,
           adminBuffer,
           Principal.equal,
         );
         switch (entryIndex) {
           case (?index) {
             ignore adminBuffer.remove(index);
             resultText := "Admin deleted successfully";
           };
           case (null) {
             resultText := "Admin does not exist";
           };
         };

       };
     };
     return resultText;

   } else {
     "You are not aproved to delete admins";
   }

 };
The addAmin() function performs the following operations:
Checks if the caller is an admin or the owner of the dapp
Checks the
adminBufferto make sure the submitted Principal is not already an adminAdds the submitted Principal in the
adminBufferReturns a relevant text message in case any of the conditions happens
The deleteAdmin() performs the following operations.
Checks if the caller is an admin or the owner of the dapp
Checks the
adminBufferto make sure the submitted Principal is on the admin listGets the index of the submitted Principal in the
adminBuffer.Removes the index from the
adminBuffer, which in turn removes the submitted Principal(the value at that index)Returns a relevant text message if any of the conditions passes or fails
 public shared({ caller }) func getAdminList() : async [Principal] {
   if (await isAdmin(caller)) {
     Buffer.toArray(adminBuffer);
   } else {
     [];
   };
 };

 public shared({ caller }) func getRequestList() : async [Principal] {
   if (await isAdmin(caller)) {
     Buffer.toArray(requestBuffer);
   } else {
     [];
   };
 };

 public shared({ caller }) func getWhiteList() : async [Principal] {
   if (await isAdmin(caller)) {
     Buffer.toArray(whitelistedBuffer);
   } else {
     [];
   };
 };
getAdminList- checks the adminBuffer and returns the admin Principals as an array. It returns an empty array if the caller is not the admin
getRequestList- checks the requestBuffer and returns the entry Principals as an array. It returns an empty array if the caller is not the admin
getWhiteList- checks the whitelistedBuffer and returns the entry Principals as an array. It returns an empty array if the caller is not the admin.
This completes our backend code in Motoko. All the code can be found in the GitHub repository.
Deployment
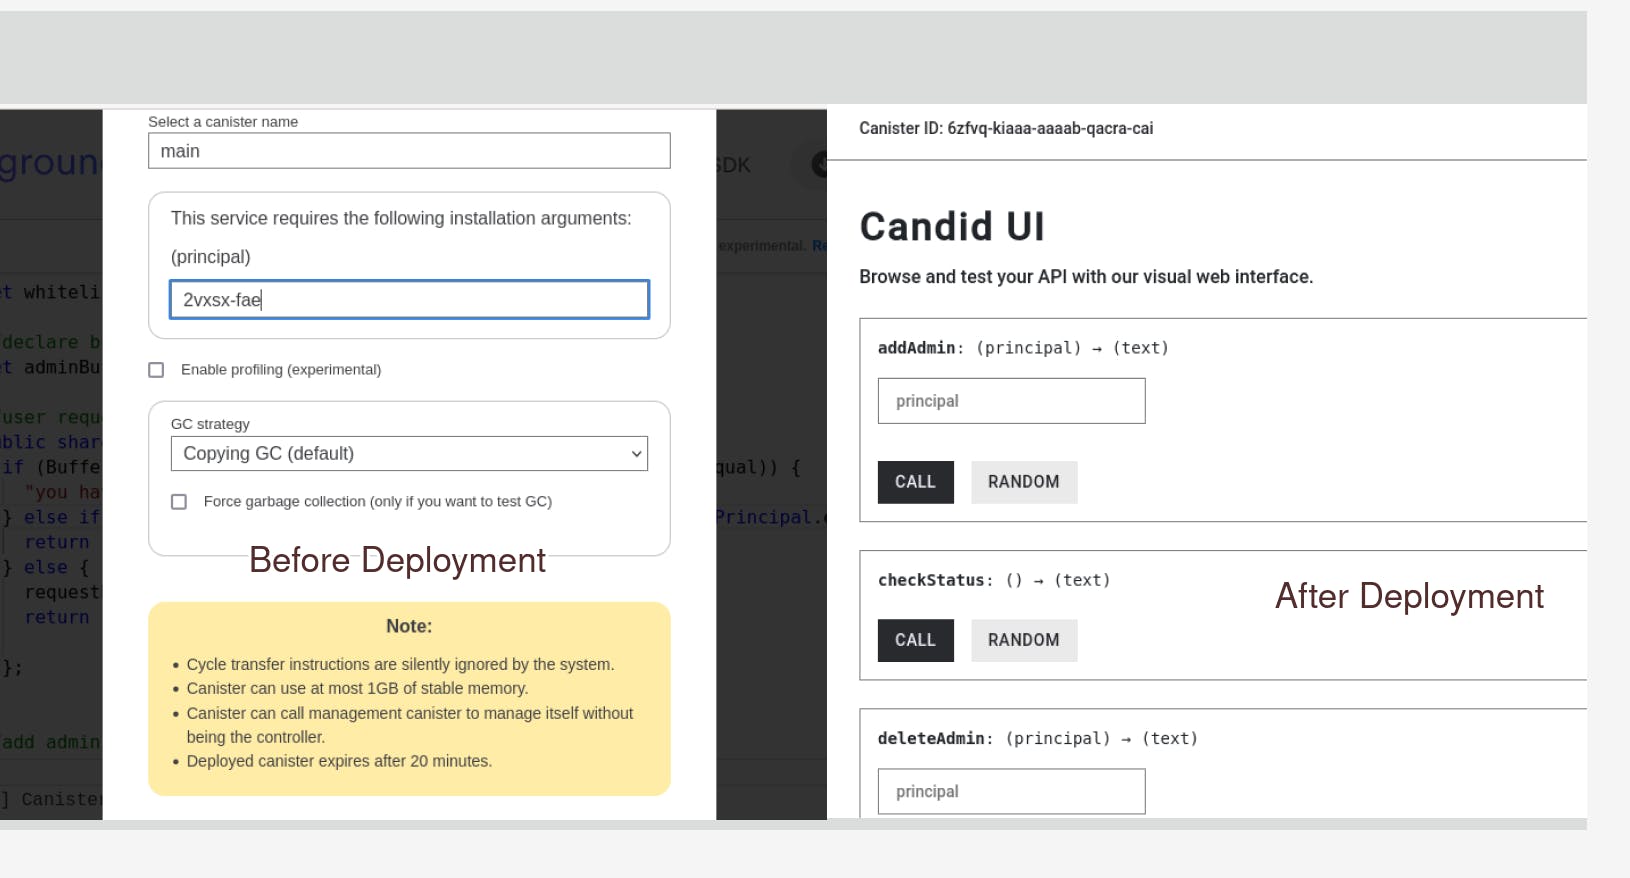
To deploy our code using the Motoko playground IDE, we need to supply a principal that will be the owner of the dapp. For now, we will supply the anonymous principal 2vxsx-fae as the owner for testing purposes.
Your Candid UI should look like this after deployment. You can test out the functions.
Frontend Development
In this section, we are going to develop our frontend for the whitelist Dapp and integrate it with Internet Computer for authentication. I have prepared a template we shall use to ease the development and save time. The project template contains three canisters in the dfx.json file
whitelistDapp_frontend - this will hold our frontend code
whitelistDapp_backend - this will hold our completed Motoko code
Internet identity -this allows us to use Internet Identity both in development(locally) and in production(mainnet).
On your machine, open the terminal or command line.
- Clone the project template from GitHub
git clone https://github.com/sam-the-tutor/whitelistDapp.git
- Navigate to the project folder
cd whitelistDapp
- Install the dependencies
npm install
- Start dfx
dfx start --clean --background
- Deploy the project locally
dfx deploy
After a successful deployment, load up the link for the front-end canister in your favorite browser. It will prompt you to login in this your Internet Identity account. On successful login, refresh your browser and your Principal ID will be displayed. Copy and save it safely. we will use it to set up the owner of our whitelist Dapp.

Backend canister deployment.
Open the project template in the code editor like VS Code or Sublime Text
Navigate to the
whitelistDap_backendfolder in a file named main.moDelete all the sample code.
Copy the project code from the Motoko playground IDE and paste it inside that file. Save the changes.
In the command line, run the following command to deploy the backend canister with your Internet Identity Principal as the owner of the dapp.
dfx deploy whitelistDapp_backend --argument '(principal "XXX-xxxx-XXX")'
Replace the XXX-xxx-XXX with the Principal ID that you copied from the frontend page. On successful deployment, running this command in the command line should return the Principal ID that you specified as the owner.
dfx canister call whitelistDapp_backend theOwner
Frontend Code development.
Navigate to the src folder inside the whitelistDapp_frontend which contains two files.
index.html- to hold our HTML for the project
index.js- to hold the Javascript code for the project
In the index.html file, replace the main tag and its elements with the following code.
<main id="whitelistDapp">
      <img src="logo2.svg" alt="DFINITY logo" />
      <br />
      <br />
      <div class="row text-center">
        <h1>Whitelist Dapp</h1>
        <h4>TUTORIAL</h4>
        <h5 class="special"> MOTOKO + INTERNET IDENTITY</h5>
    </div>
    </main>
The index.js contains the necessary functions userLogin and handleAuthenticated helps us to log in with Internet Identity to our project locally and on the mainnet. The assets folder contains the necessary CSS code for the entire project.
Frontend Login
On successful user login, the dapp should determine whether the user is an admin. Depending on the result, it should either serve the user page or an admin page. This is done by querying isAdmin function from the backend canister and passing in the Principal of the logged-in user. Only the authenticated user should be able to request a whitelist spot.
async function handleAuthenticated() {
  identity = await authClient.getIdentity();
  myPrincipal = await identity._principal.toString();

  authenticatedCanister  = createActor(canisterId, {
       agentOptions:{
            identity,
         },
     });


  if(await authenticatedCanister.isAdmin(Principal.fromText(myPrincipal))){
     displayAdminPage()
   }else{
     displayUserPage()
  }

}
Adjust the handleAuthenticated() function in `index.js` to check if the user is an admin or not and run the correct function in any of the conditions.
User Page
async function displayUserPage(){

  document.getElementById("whitelistDapp").innerHTML= ""
  const userDiv = document.createElement("div")

  userDiv.innerHTML = `
        <div class="row text-center">
        <h1>Whitelist Dapp</h1>
        <h4>User Page</h4>
        <div>
         <h5> Principal :<span id="principalId">loading....</span></h5>

          <h5> Status : <span id="statusId">loading....</span></h5>

        <div>
        <button class="btn btn-primrequestBtn" type="submit" >Request Whitelist</button>
        </div>
        </div>
        `
  document.getElementById("whitelistDapp").appendChild(userDiv)
  document.getElementById("principalId").innerText = myPrincipal;
  await checkUserStatus()
}

//check user status
async function checkUserStatus(){

  try{

    const result = await authenticatedCanister.checkStatus();
    document.getElementById("statusId").innerText = result;
  }catch(error){
    alert(error)
  }
}

//request for whitelist
document.getElementById("whitelistDapp").addEventListener("click", async (e)=>{
  if(e.target.className.includes("requestBtn")){

    try{
      const result = await authenticatedCanister.requestWhitelist();

      alert(result);
    }catch(error){
      alert(error);

    }
    await checkUserStatus()

  }

})
The displayUserPage() returns a page to display the Principal of the user, the status of the whitelist request, and a button to request the whitelist spot. It populates the respective elements with relevant information.
The checkUserStatus() checks for the whitelist status of the logged-in user by calling the checkStatus() method on the authenticatedanister. In case of any errors, we display them to the user.
We add an eventListener on the Request Whitelist button and perform the relevant operation on click, which is to request a whitelist spot.
Admin Page
async function displayAdminPage(){

  document.getElementById("whitelistDapp").innerHTML= ""
  const adminDiv = document.createElement("div")

  adminDiv.innerHTML = `
        <div class="row text-center">
        <h1>Whitelist Dapp</h1>
        <h4>Admin Dashboard</h4>
      </div>

      <div class="row text-left">
        <h5>Admin Principal : <span id="adminPrincipal"> Admin Principal</span></h5>
        <div class="text-right">
               <input type="text" id="adminPrincipalInput" placeholder="Enter Principal">
             <button class="btn btn-primary  adminPrincipalBtn" type="submit">Add Admin</button>
              </div>
          </div>

      <div class="row">
          <div class="col-4">
            Whitelist Request
            <div class="overflow-auto" id = "requestedId" style="height: 380px;">

            </div>
          </div>
          <div class="col-4">
            Whitelisted Accounts
            <div class="overflow-auto" id="whitelistedIds" style="height: 380px;">
            </div>
        </div>
        <div class="col-4">

            Admin Accounts
            <div class="overflow-auto" id="adminlistId" style="height: 380px;">
            </div>
          </div>

      </div>`
  document.getElementById("whitelistDapp").appendChild(adminDiv)
  document.getElementById("adminPrincipal").innerText= myPrincipal

  await getRequests()
  await getWhitelisted()
  await getAdmins()
 }
We perform some DOM manipulation and add a simple admin page to display
Principal ID of the logged-in admin
Principal IDs for everyone that requested to be whitelisted
Principals IDs for the whitelisted accounts
Principal IDs for the admin accounts
//fetch whitelist requests
async function getRequests(){

  let results = await authenticatedCanister.getRequestList();
  document.getElementById("requestedId").innerHTML = ""
  results.forEach((result)=>{
    const newDiv = document.createElement("div");
    newDiv.className = "card"
    newDiv.innerHTML = `
    <div class="card-body">
      <h5 class="card-title">${result.toString()}</h5>
       <a href="#" class="btn btn-primary WhitelistUser" id="${result.toString()}">Grant</a>
    </div>
    `
  document.getElementById("requestedId").appendChild(newDiv);
  })
}

//get whitelisted accounts
async function getWhitelisted(){

  let results = await authenticatedCanister.getWhiteList();
  document.getElementById("whitelistedIds").innerHTML = ""
  results.forEach((result)=>{
    const newDiv = document.createElement("div");
    newDiv.className = "card"
    newDiv.innerHTML = `
    <div class="card-body">
      <h5 class="card-title">${result.toString()}</h5>
       <a href="#" class="btn btn-primary revokeWhitelist" id="${result.toString()}">Revoke</a>
    </div>
    `
  document.getElementById("whitelistedIds").appendChild(newDiv);
  })
}

//get admin accounts
async function getAdmins(){

  let results = await authenticatedCanister.geAdminList();
  document.getElementById("adminlistId").innerHTML = ""
  results.forEach((result)=>{
    const newDiv = document.createElement("div");
    newDiv.className = "card"
    newDiv.innerHTML = `
    <div class="card-body">
      <h5 class="card-title">${result.toString()}</h5>
       <a href="#" class="btn btn-primary deleteAdmin" id="${result.toString()}">Delete<i class="bi bi-trash align-right" role="button" id=></i></a>
    </div>
    `
  document.getElementById("adminlistId").appendChild(newDiv);
  })
}
The getAdmin(), getWhitelisted(), and getRequests() functions fetch the respective results, create the respective HTML elements and display the results on the admin page.
//whitelist a user
document.getElementById("whitelistDapp").addEventListener("click", async (e)=>{
  if(e.target.className.includes("WhitelistUser")){
    const user = Principal.fromText(e.target.id);

    try{
      const result = await authenticatedCanister.whitelistUser(user);

      alert(result);
    }catch(error){
      alert(error);

    }
  }
  await getWhitelisted()
  await getRequests()

})

//delete admin
document.getElementById("whitelistDapp").addEventListener("click", async (e)=>{
  if(e.target.className.includes("deleteAdmin")){
    const user = Principal.fromText(e.target.id);

    try{
      const result = await authenticatedCanister.deleteAdmin(user);

      alert(result);
    }catch(error){
      alert(error);

    }
    await getAdmins()

  }

})

//revoke whitelist
document.getElementById("whitelistDapp").addEventListener("click", async (e)=>{
  if(e.target.className.includes("revokeWhitelist")){
    const user = Principal.fromText(e.target.id);

    try{
      const result = await authenticatedCanister.removeWhiteliste(user);

      alert(result);
    }catch(error){
      alert(error);

    }
  }
  await getWhitelisted()

})
We add EventListeners on the respective buttons Delete, Add Admin, Grant, Revoke that allows the admin to:
delete a fellow admin.
add another admin.
grant a whitelist spot to the user.
revoke the whitelist spot from the user.
This completes the code for the front end. All the code can be found in this GitHub repository.
Local deployment.
Run this command from your root project in the command line to redeploy the front-end canister.
dfx deploy whitelistDapp_frontend
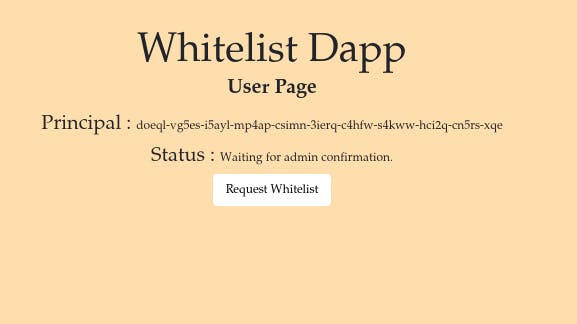
On successful deployment, open the frontend canister link in the browser After logging in with your Internet Identity, you should have something similar to this. At this stage, there is no admin, and no whitelist request, and therefore no account has been approved for a whitelist spot.

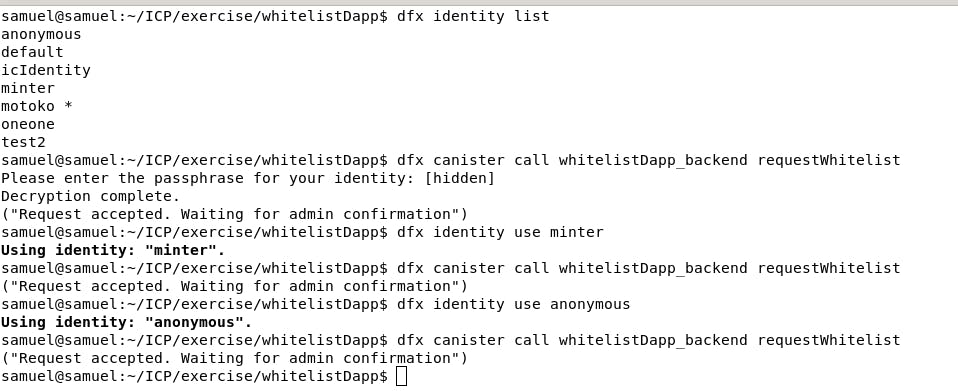
To test the project out, you can create multiple identities on the local computer and then call the requestWhitelist function on the backend canister. Below is a screenshot of how to do it.
Refresh the browser when you are done with the above step and you should have something like this.
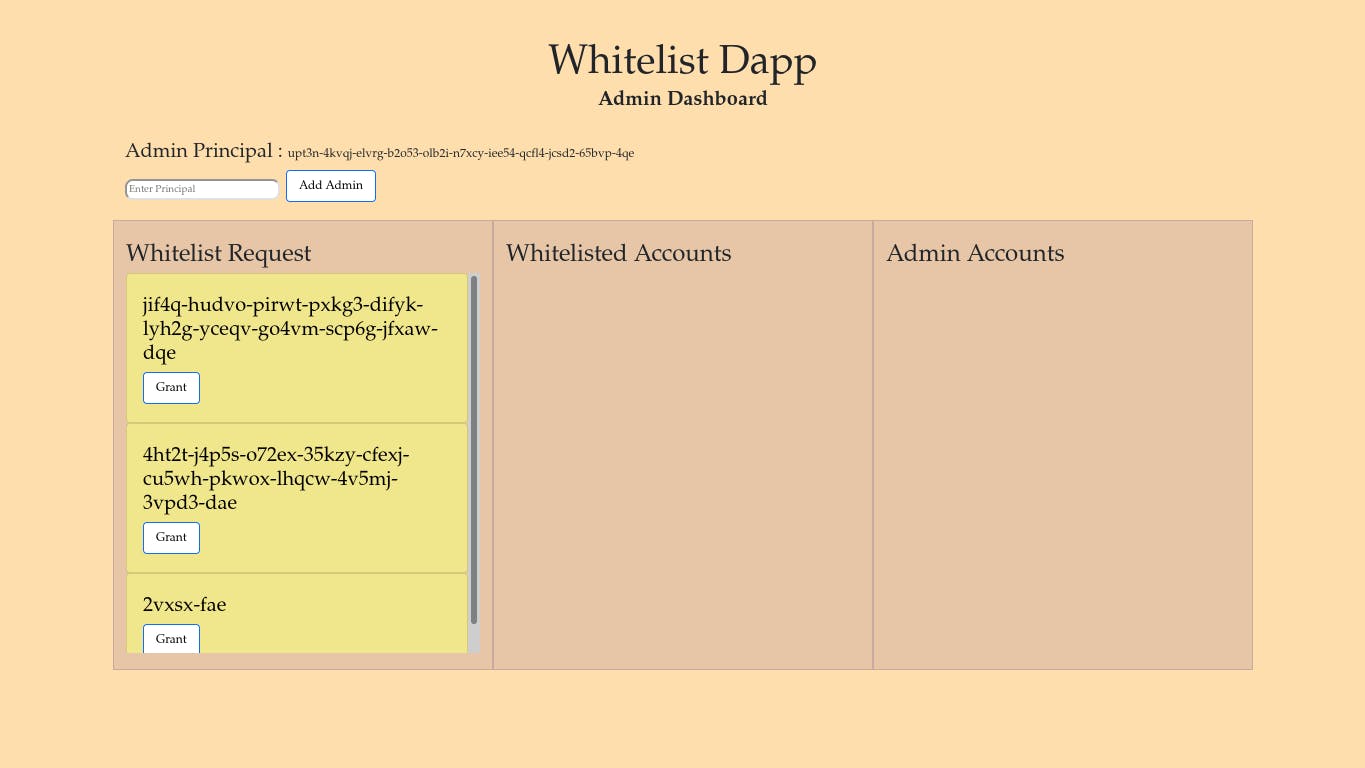
Now you have a few accounts that have requested the whitelist spot. As the owner of the dapp, you have the same privileges as the admin. You can grant the whitelist requests, revoke them, add and even remove other admin. But other admins won't be able to remove you.
Deploy the project on the Internet Computer Mainnet.
This section assumes that you have the cycles in the wallet associated with the identity that you are going to use for deployment. If not check this guide on how to get cycles to your wallet. It's time to deploy the project on the mainnet. We will first deploy the backend canister and then followed the frontend canister.
Backend canister deployment on the mainnet.
We will need the Principal ID of our Internet Identity on the mainnet to set it up as the owner of the dapp. this we will be able to access the admin dashboard. To do so, head over to this link, log in with your Internet Identity account, refresh your browser and your Principal ID will be displayed. Copy the ID.
Run this command in the terminal to deploy the whitelistDapp_backend canister on the mainnet
dfx deploy whitelistDapp_backend --network ic --argument '(principal "YYY-yyy-YYY")'
Replace the YYY-yyy-YYY with the Principal ID that you copied from the previous step.
Frontend canister deployment on the mainnet
Run this command in the terminal to deploy the frontend canister on the mainnet.
dfx deploy whitelistDapp_frontend --network ic
On successful deployment, you should be presented with a link in this format, where xxxxx-xxxxx-xxxxx-xxxxx is the id of the frontend canister on the Internet Computer.
https://xxxxx-xxxxx-xxxxx-xxxxx-cai.ic0.app
Load it in the browser, log in with your Internet Identity account and you should be able to access the admin dashboard. You can send the link to your friends to test out the Dapp. In that case, your friends will be presented with the user page since none of them is an admin. From there, they can request a whitelist spot and also view the status of their requests.
Next steps
Right now, our project cannot persist data across upgrades, leave alone the owner variable. Functionality can be added for pre and post-upgrade to persist data. More changes can be added to the project like adding a notification when a new user requests for a whitelist spot, allowing the user to provide more information aside from their Id among other improvements. Visit the Internet Computer website to learn more on how to develop dapps on their blockchain
Conclusion
In this article, you have learned how, to write Motoko code for a whitelist Dapp, develop the front end for the project, Deploy the project both locally and on the Internet Computer, and use the Internet Identity to facilitate the login and authentication. In case of any inquiries, let's connect on Twitter. I will be glad to help out.