Build a Vault Smart Contract Dapp on the Celo Blockchain
A beginner's step-by-step tutorial


Introduction
Have you ever wondered how people in real life are able to buy shares from a company they are interested in? Well, in this tutorial, we are going to create a vault smart contract Dapp on the Celo blockchain that will enable users to buy and sell shares in our company.
By the end of this tutorial, you will be familiar with how companies distribute shares to their holders and how you can implement that in a smart contract.
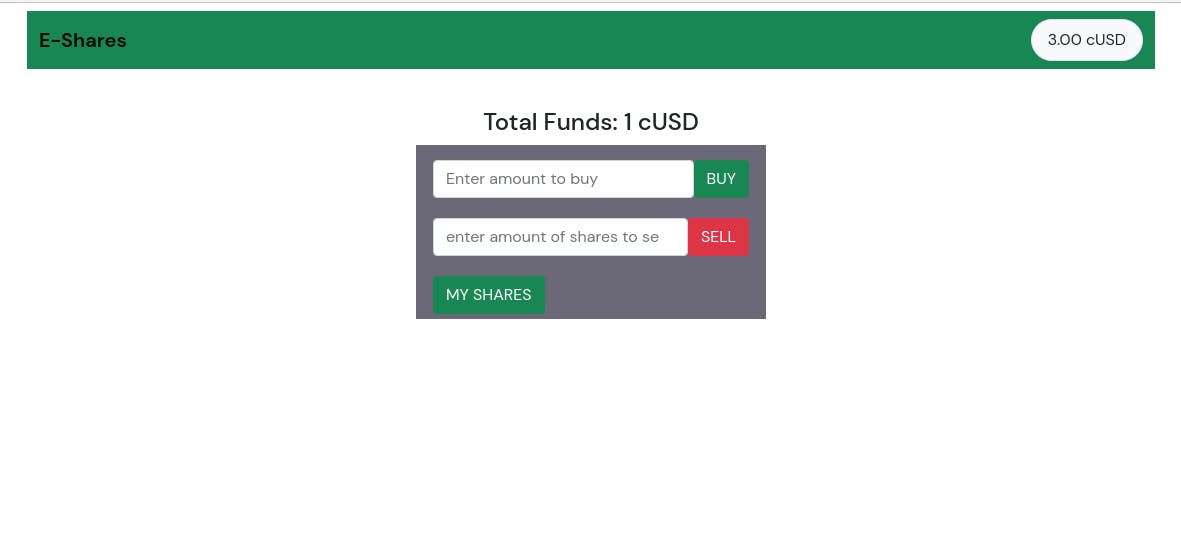
Table of contents
What you will learn in this tutorial
Writing a smart contract.
Deploying a smart contract.
Interacting with the smart contract on the Celo blockchain.
Frontend development to interact with our smart contract.
Prerequisites
To get the most out of this tutorial, I assume that you have:
Basic understanding of how blockchain and smart contracts work.
Basic programming knowledge in Javascript and Solidity.
Requirements
NodeJs installed on your machine.
An IDE such as VSCode or Sublime Text.
Terminal or command line.
Remix IDE is an online compiler that allows us to write, run and test our smart contract code, all in the browser. No need to download any file to the computer.
CeloExtensionWallet enables us to interact with our smart contract on the Celo blockchain. (Learn more about Celo Blockchain)
At the end of this tutorial, you should have a similar project. All the code for this project can be found on my GitHub.
Developing the Smart Contract
Open up your browser and load the Remix IDE. Here is what the remix looks like.

We will create a file called vault.sol where our smart contract code will be stored. Notice a new file extension of(.sol). It means our file will store Solidity code just like how a .js file stores Javascript code.
Now, we need to write code in our empty file. Copy and paste this code into the file.
// SPDX-License-Identifier: MIT

pragma solidity >=0.7.0 <0.9.0;
We start by defining the license type of our code. It is recommended to always define a license for the contract code as this is important to guide how the code will be used. The most common license used is MIT. (Learn more on licenses)
In the next line, we specify the version to use when compiling our code using the pragma keyword. There are several ways how to specify the version. In our example, we are telling the compiler to use any version between 0.7.0 and 0.9.0. Learn more about compilers here.
In real life, we need some sort of currency(USD, EUR) to be able to buy shares in the company. So we will also need to integrate a test currency that will be used in our smart contract to buy shares. Paste the code below into our file.
interface IERC20Token {
  function transfer(address, uint256) external returns (bool);
  function approve(address, uint256) external returns (bool);
  function transferFrom(address, address, uint256) external returns (bool);
  function totalSupply() external view returns (uint256);
  function balanceOf(address) external view returns (uint256);
  function allowance(address, address) external view returns (uint256);

  event Transfer(address indexed from, address indexed to, uint256 value);
  event Approval(address indexed owner, address indexed spender, uint256 value);
}
We don't need to build our currency token as there are already prebuilt tokens that we can just use in this example. We will use the cUSD (Celo dollar) that follows the ERC20 token standard. We specify how we are going to interact with the token through the above interface. Learn more about tokens, interfaces, and token standards.
Time to move on. Let's start writing code for our smart contract.
contract Vault {

     address public token = 0x874069Fa1Eb16D44d622F2e0Ca25eeA172369bC1;

    uint public totalSupply;

    uint internal DECIMALS = 10**18;

    mapping(address => uint) public balanceOf;

}
First, we declare our contract using the contract keyword, followed by the name of the contract. In our case, we call it Vault.
Just like other programming languages, Solidity also has data types, and you have to specify the data type of each variable you create. Common data types in Solidity include address, uint, bytes32, and bool. Learn more about data types.
In the above code, we declare a variable, token of data type address(we want it to store the address of the token that we will be using). Then we specify the visibility of our variable, in this case public. Visibility defines how the variable will be accessed. There are several types of visibility, but here we use public because we want to access the variable from both inside and outside the contract. (Learn more about visibility)
All our customers will have to pay using the same token(currency) that we have specified in our contract in order to buy shares.
We specify another variable DECIMALS to store the number of decimals the token uses, in our case 18. This will be used when we are trying to calculate the number of shares using the amount the user has deposited and vice versa.
Next line, we declare a variable totalSupply that will hold the total number of shares our company has issued. It is public, meaning we can get the value of this variable from outside the contract (this will be helpful when we are interacting with the contract from the front end). It is of type uint. uint variables store only positive numbers as we never want our company to have negative shares.
Let's declare one more variable balanceOf. We will track the amount of shares every user has with this variable. It is public and of type mapping. Just like arrays allow us to store values that can be accessed using the index, a mapping allows us to store key: value pairs where the value can be accessed using its key. (Learn more about mapping).
function _mint(address _to, uint _amount) private{
    totalSupply += _amount;
    balanceOf[_to] += _amount
}

function _burn(address _from , uint _amount) private{
    totalSupply -= _amount;
    balanceOf[_from] -= _amount;
}
We declare the _mint function which takes in two parameters(the address of the user to receive the shares, and the amount of shares to give out). It is private because we only want to access it inside our smart contract.
Inside the _mint function, two things take place. One is increasing the total number of shares our company has issued, and updating the number of shares held by a specific user address.
Let's declare another function _burn, it is private and does two things. Decreasing the total number of shares our company has issued, and updating the number of shares held by a specific address.
Function to buy shares from the company
 function depositFunds(uint _amount)  external{
    uint shares;
    require(IERC20Token(token).transferFrom(
        msg.sender,
        address(this),
        _amount
        ),"Transfer failed"
    );

    shares =(_amount / DECIMALS);

    _mint(msg.sender,shares);
   }
We define our depositFunds() function, it takes in one parameter(the amount, a user has deposited). For now, we will sell one share for 1 cUSD. Inside the function, we declare a variable shares of type uint to hold the number of shares.
Use the require keyword to ensure that the customer pays for the shares before we issue them out(Learn more about require).
Next, we calculate how many shares the customer will receive depending on how much they have deposited.
Note: To get the shares, we are dividing the amount the user has deposited by the number of decimals of the token. (This is because we get the parameter as a big number with 18 decimals) Then, call the
_mint()function to issue out shares to our customer.
Function to sell their company shares
function withdraw(uint _shares) external{

        require(balanceOf[msg.sender] >= _shares,"You dont have enough shares");

        _burn(msg.sender, _shares);_burn(msg.sender, _shares);
        require(IERC20Token(token).transfer(
            payable(msg.sender),
            (_shares * DECIMALS)
            ),"Transfer failed"
        );
    }
Inside the function, we first check to see if the user has the shares he wants to sell.
Then we give out the funds corresponding to the number of shares. Finally, we call the _burn() function to deduct the shares from the user's account and update the total shares the company holds.
In order for the user to receive funds, their address has to be configured to receive them. This is done using the payable keyword. (Learn more on payable)
function getMyShares() public view returns(uint){
        return balanceOf[msg.sender];
    }
We define getMyShares() functionthat returns a value of uint type, which is the total number of shares held by a user. It's a view function because it is accessing the state variables. Learn more about view and pure functions.
function getContractBalance() public view returns(uint) {
        return IERC20Token(token).balanceOf(address(this));
    }
Our last function getContractbalance() returns the total funds the contract currently holds.
This completes our smart contract code. Here is what the complete code should look like.
// SPDX-License-Identifier: MIT

pragma solidity >=0.7.0 <0.9.0;

interface IERC20Token {
  function transfer(address, uint256) external returns (bool);
  function approve(address, uint256) external returns (bool);
  function transferFrom(address, address, uint256) external returns (bool);
  function totalSupply() external view returns (uint256);
  function balanceOf(address) external view returns (uint256);
  function allowance(address, address) external view returns (uint256);

  event Transfer(address indexed from, address indexed to, uint256 value);
  event Approval(address indexed owner, address indexed spender, uint256 value);
}

contract Vault {

    address public token = 0x874069Fa1Eb16D44d622F2e0Ca25eeA172369bC1;

    uint public totalSupply;

    uint internal DECIMALS = 10**18;

    mapping(address => uint) public balanceOf;


    function _mint(address _to, uint _amount) private{
        totalSupply += _amount;
        balanceOf[_to] += _amount
    }


    function _burn(address _from , uint _amount) private{
        totalSupply -= _amount;
        balanceOf[_from] -= _amount;
    }


 function depositFunds(uint _amount)  external{
    uint shares;
    require(IERC20Token(token).transferFrom(
        msg.sender,
        address(this),
        _amount
        ),"Transfer failed"
    );

    shares =(_amount / DECIMALS);

    _mint(msg.sender,shares);
   }


function withdraw(uint _shares) external{

        require(balanceOf[msg.sender] >= _shares,"You dont have enough shares");

        _burn(msg.sender, _shares);
        require(IERC20Token(token).transfer(
            payable(msg.sender),
            (_shares * DECIMALS)
            ),"Transfer failed"
        );

    }


    function getMyShares() public view returns(uint){
        return balanceOf[msg.sender];
    }

  function getContractBalance() public view returns(uint) {
        return IERC20Token(token).balanceOf(address(this));
    }

}
Time to deploy our contract and test it out.
Install the CeloExtensionWallet
Grab some testnet tokens from the Celo Faucet
Install the Celo Remix Plugin.
Follow the Celo Development 101 course on Dacade for a guide on how to deploy your smart contract.
After deployment, we will need two things; the contract ABI, and the contract address. Learn more about ABIs.
Front End Development
We will design a simple webpage to interact with the smart contract that we have deployed.
We will use a boilerplate for our project.
- Clone the boilerplate using the command:
git clone https://github.com/sam-the-tutor/celo-Tutorial-boilerplate.git
- Navigate to the boilerplate using the command:
cd celo-boilerplate-vault-dapp
- Install the necessary dependencies using the command:
npm install
- Start up a local development server on your machine using the command:
npm run dev
Our project folder contains three folders contract, public, and src. Inside the contract folder, we have three files: vault.sol - This holds our contract code. vault.abi.json - This holds the ABI bytecode for our contract. erc20.abi.json - This holds the ABI bytecode for the ERC20 interface we are using for our token.
Open the project in your favorite code editor, and let's write some code.
In the public folder, open the index.html file and paste the following code
<!DOCTYPE html>
<html lang="en">
  <head>
    <!-- Required meta tags -->
    <meta charset="utf-8" />
    <meta name="viewport" content="width=device-width, initial-scale=1" />
Specify the document type and add some meta tags in the section.
<!-- CSS -->
    <link
      href="https://cdn.jsdelivr.net/npm/bootstrap@5.0.0-beta2/dist/css/bootstrap.min.css"
      rel="stylesheet"
      integrity="sha384-BmbxuPwQa2lc/FVzBcNJ7UAyJxM6wuqIj61tLrc4wSX0szH/Ev+nYRRuWlolflfl"
      crossorigin="anonymous"
    />
    <link rel="preconnect" href="https://fonts.gstatic.com" />
    <link
      href="https://fonts.googleapis.com/css2?family=DM+Sans:wght@400;500;700&display=swap"
      rel="stylesheet"
    />
    <link
      rel="stylesheet"
      href="https://cdn.jsdelivr.net/npm/bootstrap-icons@1.4.0/font/bootstrap-icons.css"
    />

     <style>
      :root {
        --bs-font-sans-serif: "DM Sans", sans-serif;
      }

      @media (min-width: 576px) {
        .card {
          border: 0;
          box-shadow: rgb(0 0 0 / 5%) 0px 10px 20px;
          border-radius: 10px;
        }

        .card-img-top {
          width: 100%;
          height: 20vw;
          object-fit: cover;
        }
      }
      .sharesDiv{
        width: 350px;
        margin: auto;
        background-color: rgb(107,104,120);
        }
    </style>
We import some Bootstrap files, and Google fonts for our HTML. Bootstrap reusable components help you to build responsive websites from scratch. Learn more about Bootstrap.
   <title>E-Shares</title>
  </head>
   <body>
    <div class="container mt-2" style="max-width: 72em">

      <nav class="navbar bg-white navbar-light">
        <div class="container-fluid">
          <span class="navbar-brand m-0 h4 fw-bold">E-Shares</span>
          <span class="nav-link border rounded-pill bg-light">
            <span id="balance">0</span>
            cUSD
          </span>
        </div>
      </nav>
      <div class="alert alert-warning sticky-top mt-2" role="alert">
    <span id="notification">⌛ Loading...</span>
  </div>
We add a title and a navbar to our HTML file. In the navbar, we create elements to display the name of the dapp, show notifications, and then the balance of the user address.
<main id="vault" class="row" style="margin-top: 3.5%;"></main>
 </div>
    ```

Add a main tag with id `vault`, this is where we shall display all the content.

Inside the main tag, paste the following code:

```html
     <h4 align="center">Total Funds:  <span id="totalFunds"></span></h4>
    <div class="sharesDiv">


      <div style="display: flex;margin-top: 10px; padding: 5px;" >
        <input type="number" class="form-control" id="sharesAmount"  placeholder="Enter amount to buy">
        <a href="#" class="btn btn-success" id="buyShares" role="submit">BUY</a>
      </div>


      <div style="display: flex; margin-top: 10px;padding: 5px;">
        <input type="number" class="form-control" id="sellAmount" placeholder="enter amount of shares to sell">
         <button class="btn btn-danger" id="sellShares">SELL</button>
      </div>


      <div style="display: flex; margin-top: 10px;padding: 5px;">
        <a href="#" class="btn btn-success "  role="submit" id="getShares">MY SHARES</a>
        <span id="allShares" style="margin-left: 15px;"></span>
      </div>


    </div>
We create three buttons; BUY - Allows the user to deposit money in the smart contract and buy shares SELL - Allows the user to sell his shares and get his funds back. MY SHARES - Allows the user to view how many company shares he holds.
Users are able to enter the amount of money to deposit in order to buy shares, and also to specify the number of shares to sell.
Now open main.js file in the src folder and paste the following code:
import Web3 from 'web3'
import { newKitFromWeb3 } from '@celo/contractkit'
import BigNumber from "bignumber.js"
import vaultAbi from '../contract/vault.abi.json'
import erc20Abi from "../contract/erc20.abi.json"
We import the Web3,newKitFromWeb3, BigNumber,vaultAbi, erc20Abifrom their respective libraries.
const ERC20_DECIMALS = 18

const vaultContactAddress = "0x9F6654619Fac3Ca99898990a31C3A4bc9B3795C0"
const cUSDContractAddress = "0x874069Fa1Eb16D44d622F2e0Ca25eeA172369bC1"
We declare a variable ERC20_DECIMALS and assign 18 as its value. Most ERC20 tokens and interfaces use 18 decimals by default. Next, we declare a variable vaultContractAddress to store the address of our contract which we deployed. Replace it with the address of your deployed contract. The variable cUSDContractAddress stores the address of the token(cUSD) that we will be using on our dapp.
let kit
let contract
let accounts
We define the variables that will store the kit and contract instances that we will create after.
To connect to the Celo extension wallet, add the following code to main.js file.
const connectCeloWallet = async function () {
  if (window.celo) {
    try {
      notification("⚠️ Please approve this DApp to use it.")
      await window.celo.enable()
      notificationOff()
      const web3 = new Web3(window.celo)
      kit = newKitFromWeb3(web3)

      accounts = await kit.web3.eth.getAccounts()
      kit.defaultAccount = accounts[0]

      contract = new kit.web3.eth.Contract(vaultAbi, vaultContactAddress)

    } catch (error) {
      notification(`⚠️ ${error}.`)
    }
  } else {
    notification("⚠️ Please install the CeloExtensionWallet.")
  }
}
In ourconnectCeloWallet() function, we check if the user has installed the CeloExtensionWallet. If not, we notify the user to install it. Otherwise, we notify the user to enable the dapp to connect to the wallet.
After the user has approved the dapp, we get the address connected to the dapp and define it as kit.defaultAccount.
Next, we create a contract instance from our vaultAbi and vaultContractAddress
Read more on how to create contract instances to interact with the smart contracts here
const getBalance = async function () {
  const totalBalance = await kit.getTotalBalance(kit.defaultAccount)
  const cUSDBalance = totalBalance.cUSD.shiftedBy(-ERC20_DECIMALS).toFixed(2)
  document.querySelector("#balance").textContent = cUSDBalance
}
Using the kit instance we created before, getTotalBalance() function checks for the token balance of the user address(kit.defaultAccount) connected to the dapp.
The totalBalance() function returns an object containing the user's balance for both cUSD and Celo tokens. We will only display the cUSD token balance.
Since the value retrieved is a BigNumber. We have to first format it, by shifting the decimal places 18 places left, and using toFixed(2) to display only two decimal places
The function then updates the HTML element with the id balance with the formatted value.
window.addEventListener('load', async () => {
  notification("⌛ Loading...")
  await connectCeloWallet()
  await getBalance()
  await getAllfunds()
  notificationOff()
});
We add an event listener to our page. Every time the page loads, we connect to our wallet and get the balance of the address.
async function approve(_price) {
        const cUSDContract = new kit.web3.eth.Contract(erc20Abi, cUSDContractAddress)

        const result = await cUSDContract.methods
          .approve(vaultContactAddress, _price)
          .send({ from: kit.defaultAccount })
        return result
      }
Next, we define our approve() function. This function allows the user to set an amount, the smart contract is able to spend on the user's behalf. Before the smart contract can transfer funds from the user's account to itself, it has to first get permission from the user on how much it can transfer. Learn more on approve methods.
document
.querySelector("#buyShares")
.addEventListener("click", async (e) => {
  notification("Waiting for approval to buy shares")

  const price = new BigNumber(document.getElementById("sharesAmount").value)
                    .shiftedBy(ERC20_DECIMALS)
                    .toString()

        try{

          await approve(price)
          notification(`Awaiting payment to buy shares`)

          const result = await contract.methods
            .depositFunds(price)
            .send({ from: kit.defaultAccount })
            notification(`You have successfully bought shares`)
             await getAllfunds()
             await  getBalance()


        }catch(error){
           notification(`⚠️ ${error}.`)

        }

  notificationOff()
})
When the user clicks on the BUY button. We get the amount that he wants to deposit, then convert it to a BigNumber.
The user gives permission to the smart contract to spend a certain amount of funds on his behalf using the approve() method.
After the permission is granted, we call the depositFunds() function and this will deduct the amount from the user's account and in return issues a corresponding number of shares.
We then call the function getAllFunds() to display the total amount of funds stored in our smart contract, and getBalance() to display the new token balance of the user after the transactions.
document
.querySelector("#sellShares")
.addEventListener("click", async (e) => {
  notification("Selling your shares.")

  const amount = document.getElementById("sellAmount").value

      try{

        const result = await contract.methods
            .withdraw(amount)
            .send({ from: kit.defaultAccount })
            notification(`You have successfully sold shares`)
            await getAllfunds()
            await  getBalance()


      }catch(error){
      notification("Sale of shares failed")
  }
  notificationOff()
})
When the user clicks on the SELL button, we get the number of shares that they want to sell. Using the contract.methods(), we call the withdraw() function on the smart contract that will sell their shares and deposit an equivalent amount of cUSD in their account.
document
.querySelector("#getShares")
.addEventListener("click", async (e) => {
  notification("Loading your shares.")

      try{

        const shares = await contract.methods
            .getMyShares()
            .call()
        document.querySelector("#allShares").textContent = shares

      }catch(error){
      notification("Sale of shares failed")
  }
  notificationOff()
})
When the user clicks on MY SHARES button, we get the total number of shares a user has by calling the getMyShares() function from the smart contract. We then update the element with the id allShares to display the value to the user.
async function getAllfunds(){

  try{

      const balance = await contract.methods
            .getContractBalance()
            .call()

            const _balance = BigNumber(balance)
             .shiftedBy(-ERC20_DECIMALS)

        document.querySelector("#totalFunds").textContent = `${_balance} cUSD`

  }catch(error){
    notification(error)
  }
}
This function returns the total amount of funds (cUSD) stored in our smart contract and displays the value to the user.
function notification(_text) {
  document.querySelector(".alert").style.display = "block"
  document.querySelector("#notification").textContent = _text
}

function notificationOff() {
  document.querySelector(".alert").style.display = "none"
}
We define some functions to display notifications to the user on what's taking place.
That's pretty much all the code we need for our main.js.
Note: We wrap each of the methods in a try and catch. We want to be able to get the errors and show them to the user in case something goes wrong .
Hosting the Dapp on GitHub Pages
- Build the project
npm run build
Upload your project to GitHub
Inside your project on Github, click on
settings, then selectGithub PagesSelect the master branch and the
docsfolder as the source.GitHub will deploy your project, and in a few minutes the dapp
URLwill be displayed under theGithub Pagessection.
All the code for this project can be found on my GitHub and here is a link to the demo.
Conclusion
Congratulations!!!!, you now have a fully functional Dapp on the Celo blockchain. Feel free to play around with the code and add some functionality to the dapp. See you soon!!!!!!
Author
Sam-the-tutor is a back-end, smart-contract developer, and technical writer. He is very passionate about Web3 and AI. Let's connect on Twitter